

How to Set Up a Drum Kit? Step by Step Beginner-Friendly Guide
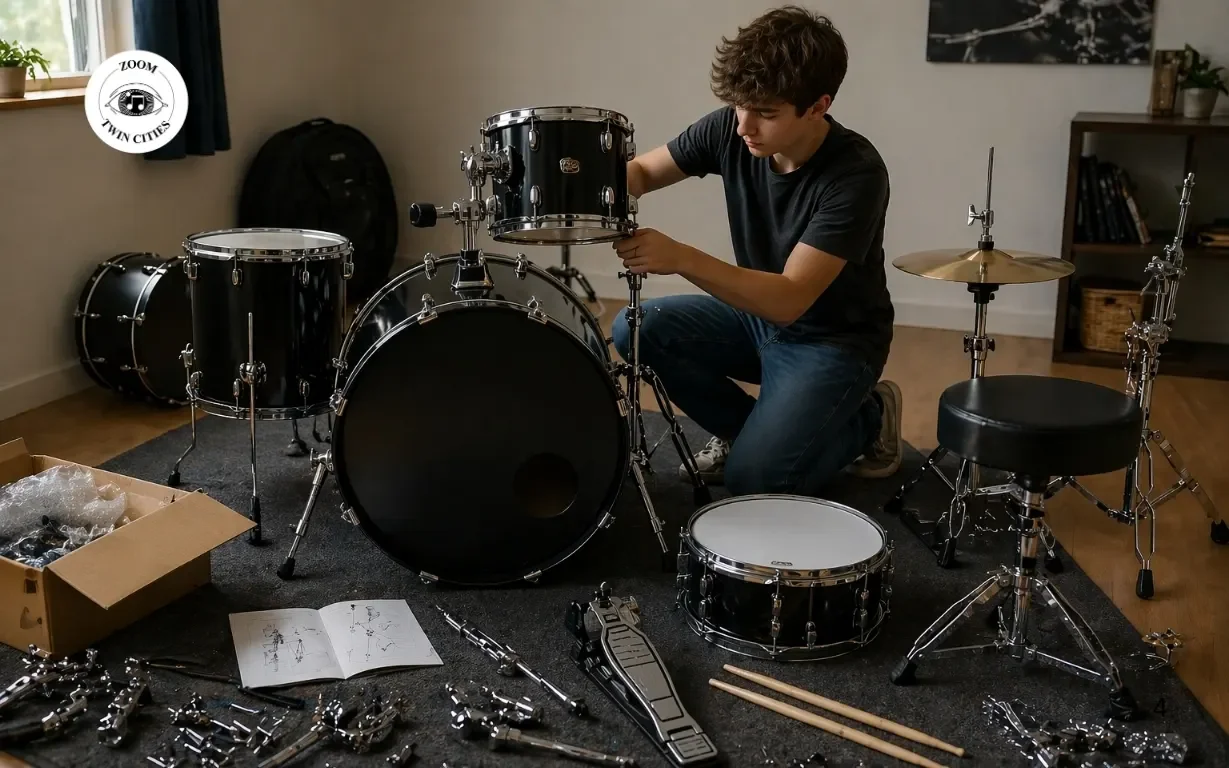
So you just got your drum kit. Exciting, right? That feeling when it’s all sitting there in boxes is real. But here’s the thing. If you don’t set it up properly, playing will feel awkward. Your hands won’t flow, your legs will feel off, and honestly, it will be difficult to move. You'll tire out much quicker than you should.
A bad setup messes with your posture, your reach, everything. The good news? Setting up a drum kit step by step is actually pretty simple once you know what to do. It’s not rocket science. Let’s break it down.
Zoom Twin Cities ensures beginners start off on the right foot with proper setup, solid technique, and real progress from day one. Don’t guess your way through it. Book your first Drum lesson today and start playing with confidence.
Drum Kit Parts You Need Before Setup
Before you touch a single stand, make sure you have all your parts laid out in front of you. Sounds obvious, but you’d be surprised how many beginners start assembling and then realize something’s missing halfway through. So just do this first.
Here’s what a standard kit includes:
Bass drum (kick)
Snare drum
Tom-toms (rack toms + floor tom)
Hi-hat
Crash cymbal
Ride cymbal
Drum throne (your seat)
Pedals and stands
Drum key
Lay everything out on the floor before you start. Trust me, it saves a lot of back-and-forth later. Plus, you get a feel for how much space you’re actually working with.
Recommended Read: What Every Beginner Drummer Should Know Before Getting Started?
Step-by-Step Drum Kit Setup

Alright, this is the main part. Don’t skip around follow this in order. Each step builds on the last, so the sequence actually matters.
Unboxing and Preparation
Open everything up and place it neatly around you. Don’t rush this part. Seriously. Check all your parts, count the bolts, and make sure nothing’s missing. It’s way easier to deal with a missing part now than halfway through setup.
Then, before anything else, put a rug down. This keeps your whole kit from sliding across the floor while you play, which happens more than you’d think. It also protects your floor. Honestly, this one small thing makes a huge difference, and most beginners skip it entirely.
Set the Bass Drum and Throne
Place the bass drum right in front of where you’ll be sitting. Extend the legs (called spurs) on the bottom so they stay firmly in place. Then attach your kick pedal. Make sure the beater is aimed at the dead center of the drumhead. Off-center hits sound weak and wear the head unevenly over time.
Now sit down on your drum throne. This is important get this right before you position anything else. Adjust the height so your thighs are flat or angled just slightly downward, and your feet can rest naturally on the pedals without straining.
Basically, if your seating position feels wrong, everything else is going to feel wrong too. So nail this first. Your throne height controls everything. If it feels even slightly off, adjust it now, don’t wait till the whole kit is set up.
Position the Snare Drum
The snare goes right between your legs this is your most-used drum, so it needs to feel like second nature to reach. Height-wise, aim for roughly waist level. Not too high, not too low.
Tilt it slightly toward you. Just a little you’re not trying to play a tilted table, just enough so the angle feels natural when you strike it. This is your main drum. Make it comfortable. If it feels awkward now, it’ll feel ten times more awkward when you’re trying to play a beat.
Recommended Read:Why Learning Drum is The Best Way to Relieve Stress?
Arrange the tom-toms.
Rack toms are mounted above the bass drum. Angle them toward you the goal is that you shouldn’t have to reach or twist to hit them. If you’re straining your shoulder to reach a tome, it’s too far or too high.
The floor tom goes on your right side. Keep it close and set it at roughly the same height as your snare. That makes transitions between snare and floor tom feel smooth and natural, instead of like you’re playing two completely different instruments.
Set Up the Hi-Hat
Hi-hat stands go on your left side, nice and close to the snare. You’ll be hitting the hi-hat constantly, so if it’s too far away, your left arm is going to fatigue fast.
Adjust the cymbals so there’s a small gap between them when they’re in the open position. That gap affects how the cymbal sounds too wide and it sounds loose and washy, or just right and you get that crisp, controlled sound.
Small gap = better sound control. Too wide and it gets sloppy. Try experimenting until you find the right fit.
Add Crash and Ride Cymbals
The crash cymbal goes front-left or center wherever you can reach it naturally with your left hand without twisting it. The ride cymbal goes on your right, usually a little higher and farther back since you’ll mostly play it with your right hand in a steady pattern.
Here’s something a lot of beginners get wrong: they overtighten the wing nuts on the cymbal stands. Don’t. Cymbals need to swing freely when you hit them that’s how they produce that full, natural sound. Clamp them down too tight and they sound choked and dead.
If your cymbals feel stiff and don’t swing when you tap them, loosen the wing nut a little. It makes a noticeable difference.
Check Ergonomics and Comfort
Now sit in your playing position and actually test everything. Don’t just look at it play it. Move around the kit a bit. Ask yourself honestly, Can I reach everything without stretching or leaning? Are my arms relaxed at a natural angle? Any tension in my back, shoulders, or wrists? Does moving between drums feel smooth?
If anything feels off, fix it now. Seriously. Playing on a badly set up kit builds bad habits fast, and some of them are really hard to undo later. At the end of the day, comfort isn’t just about feeling nice it’s about playing better and not getting hurt.
Tune Your Drum Kit
Many beginners skip this step and then wonder why their kit sounds bad. Tuning matters. Grab your drum key and tighten the lugs on each drumhead. Go in a crisscross pattern (like tightening bolts on a car wheel) so the tension stays even across the whole head.
You don’t need to be perfect here just get it to a consistent pitch and make sure no lug is way tighter or looser than the others.
Bass drums sound too boomy? Toss a small pillow or folded towel inside the shell. Sounds silly, but it works wonderfully it dampens the resonance without killing the punch.
How Long Does It Take to Set Up a Drum Kit?
It depends on where you’re at. Beginners 20–40 minutes With practice 10–15 minutes The more you do it, the faster you get. The first time is always the longest; after that, it becomes muscle memory. Simple.
Drum Kit Layout Explained (Easy Way to Remember)
Think of your setup like a circle around you. Everything radiates outward from where you’re sitting. The goal is simple you should reach everything without stretching or twisting.
Here’s a clear breakdown:
| Position | Drum / Cymbal | What It Means |
|---|---|---|
| Left | Hi-hat + Crash | These sit on your left side. You’ll use the hi-hat constantly, so keep it close. Crash should be easy to hit without lifting your arm too high. |
| Front | Bass Drum | This is directly in front of you. Your foot controls it, so it should line up naturally with your body. |
| Right | Floor Tom + Ride | These go on your right side. Keep them close enough so you don’t lean when switching from snare to tom or ride. |
| Center | You + Snare | You sit in the center. The snare sits between your legs — this is your main drum, so it must feel natural. |